> ## Documentation Index
> Fetch the complete documentation index at: https://quester.mintlify.site/llms.txt
> Use this file to discover all available pages before exploring further.
# Your first ten minutes
> The five-step move-in that turns an empty workspace into a project your advisor can actually read.
Instead of a tour, Quester asks you to move in, which takes five steps and about ten minutes and leaves you holding a real project: your own sources in it, your questions written down, and one specific observation from your advisor about what you brought. None of it is throwaway setup, because every step produces something the rest of the app goes on to read. You can leave at any point with **Finish later →**, and since the flow works out where you got to by looking at what already exists in the project, coming back a week later costs you nothing. If someone has invited you to a workspace that already exists, you will see your invitations here instead, in which case skip ahead to [Getting around](/manual/getting-around).
## Before you begin
You need a Quester account and about ten uninterrupted minutes. If you already keep references in Zotero, Mendeley, or EndNote, export the library as BibTeX or RIS before you start. You can also bring up to five research documents, paste references or DOIs, or begin with an empty library.
Have the working version of your research question nearby. It does not need proposal-ready wording; one honest sentence is enough.
If you still need an account, choose **Create account** on the sign-in page. Accept the Terms of Service and Privacy Policy using the checkbox below the email field, then continue with Google or email. If you reached sign-in from a link inside Quester, the app preserves that destination through authentication, subject to your access to the workspace or project.
## Step 1: About your work
Name the project after the real thing, meaning your thesis or your study or the grant rather than "Test" or "PhD", since you will be looking at this name for years and your advisor uses it too.
Then answer *What is it about?* in a sentence or two, and rough phrasing is fine. Of everything in the flow this is the field that matters most, because it becomes the first thing your advisor knows about your work, and it seeds the "about my work" statement you can rewrite later under [Tuning the Advisor](/manual/advisor-preferences).
Two more fields, both optional and both worth filling in. *Where are you in the arc?* places the project in the doctoral sequence (Coursework, Proposal, Data & writing, Drafting, Defending), which matters because an advisor talks differently to someone in coursework than to someone three weeks from a defence, while *Your field* ("Higher Education", "Molecular Biology") gives it your discipline's vocabulary.
This step is also the one that creates the project, so it is the only step you cannot come back to.
## Step 2: Bring in your sources
Your sources are the raw material, and since the Map, the Advisor and References all read from this library, a project with nothing in it is a project where most of the app has nothing to say.
Zotero is the featured path, because that is where most people's libraries already live:
1. In Zotero: **File → Export Library…**
2. Choose **BibTeX** or **RIS** and save the file.
3. Drop the export onto the panel.
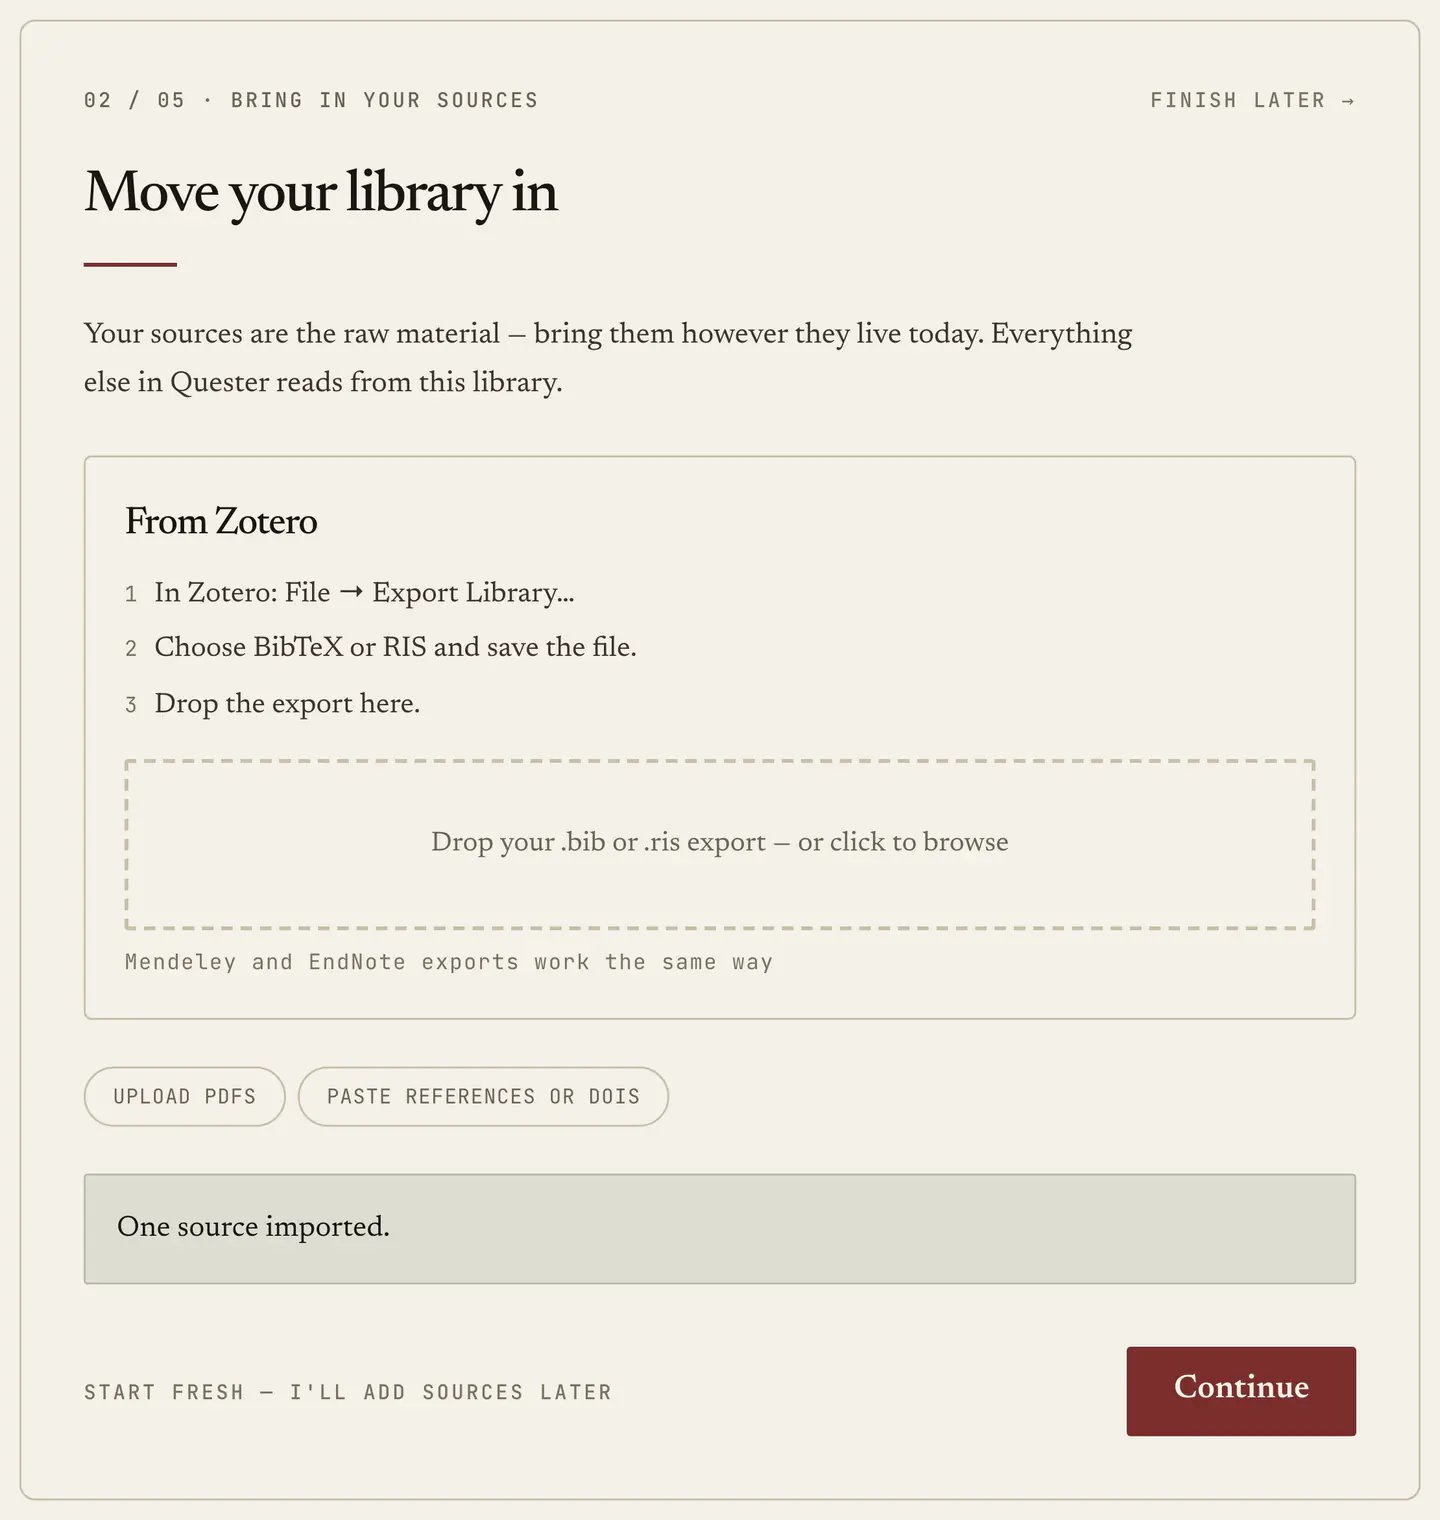 Your browser parses the file and the references appear as rows straight away, and because Mendeley and EndNote speak the same two formats they work the same way. Duplicates get caught by DOI and by title-and-year and you are told how many were skipped, so re-importing a library you have already brought in costs you nothing.
Two other paths sit underneath. **Upload PDFs** takes the actual files, which go into a queue and become sources once they have been read, which is why the step says files are still being read instead of pretending they are done. **Paste references or DOIs** takes a bibliography, a reference list, or a handful of DOIs as plain text.
If you would rather start empty, **Start fresh: I'll add sources later** is a real option that costs you nothing, since you can add sources any time from [Sources](/manual/desk-sources).
## Step 3: Your questions
Write down what you are trying to find out, up to seven of them, one per box, remembering that one honest question beats six hedged ones.
Rough phrasing is expected, because this is not the version that goes in your proposal. What matters is that your advisor now has something to read the library *against*: a corpus with no questions is a pile of papers, whereas a corpus with questions is evidence for or against something. You will sharpen these later in [Questions](/manual/desk-questions).
## Step 4: Meet your advisor
Your advisor reads what you just brought in and writes one observation about it.
What you get is a first read rather than a summary, drawn from your actual sources: what the library leans toward, where it is thin, which of your questions have material behind them and which do not. If uploads from step 2 are still processing, the step waits a moment so the read can cover as much of the library as possible.
Your browser parses the file and the references appear as rows straight away, and because Mendeley and EndNote speak the same two formats they work the same way. Duplicates get caught by DOI and by title-and-year and you are told how many were skipped, so re-importing a library you have already brought in costs you nothing.
Two other paths sit underneath. **Upload PDFs** takes the actual files, which go into a queue and become sources once they have been read, which is why the step says files are still being read instead of pretending they are done. **Paste references or DOIs** takes a bibliography, a reference list, or a handful of DOIs as plain text.
If you would rather start empty, **Start fresh: I'll add sources later** is a real option that costs you nothing, since you can add sources any time from [Sources](/manual/desk-sources).
## Step 3: Your questions
Write down what you are trying to find out, up to seven of them, one per box, remembering that one honest question beats six hedged ones.
Rough phrasing is expected, because this is not the version that goes in your proposal. What matters is that your advisor now has something to read the library *against*: a corpus with no questions is a pile of papers, whereas a corpus with questions is evidence for or against something. You will sharpen these later in [Questions](/manual/desk-questions).
## Step 4: Meet your advisor
Your advisor reads what you just brought in and writes one observation about it.
What you get is a first read rather than a summary, drawn from your actual sources: what the library leans toward, where it is thin, which of your questions have material behind them and which do not. If uploads from step 2 are still processing, the step waits a moment so the read can cover as much of the library as possible.
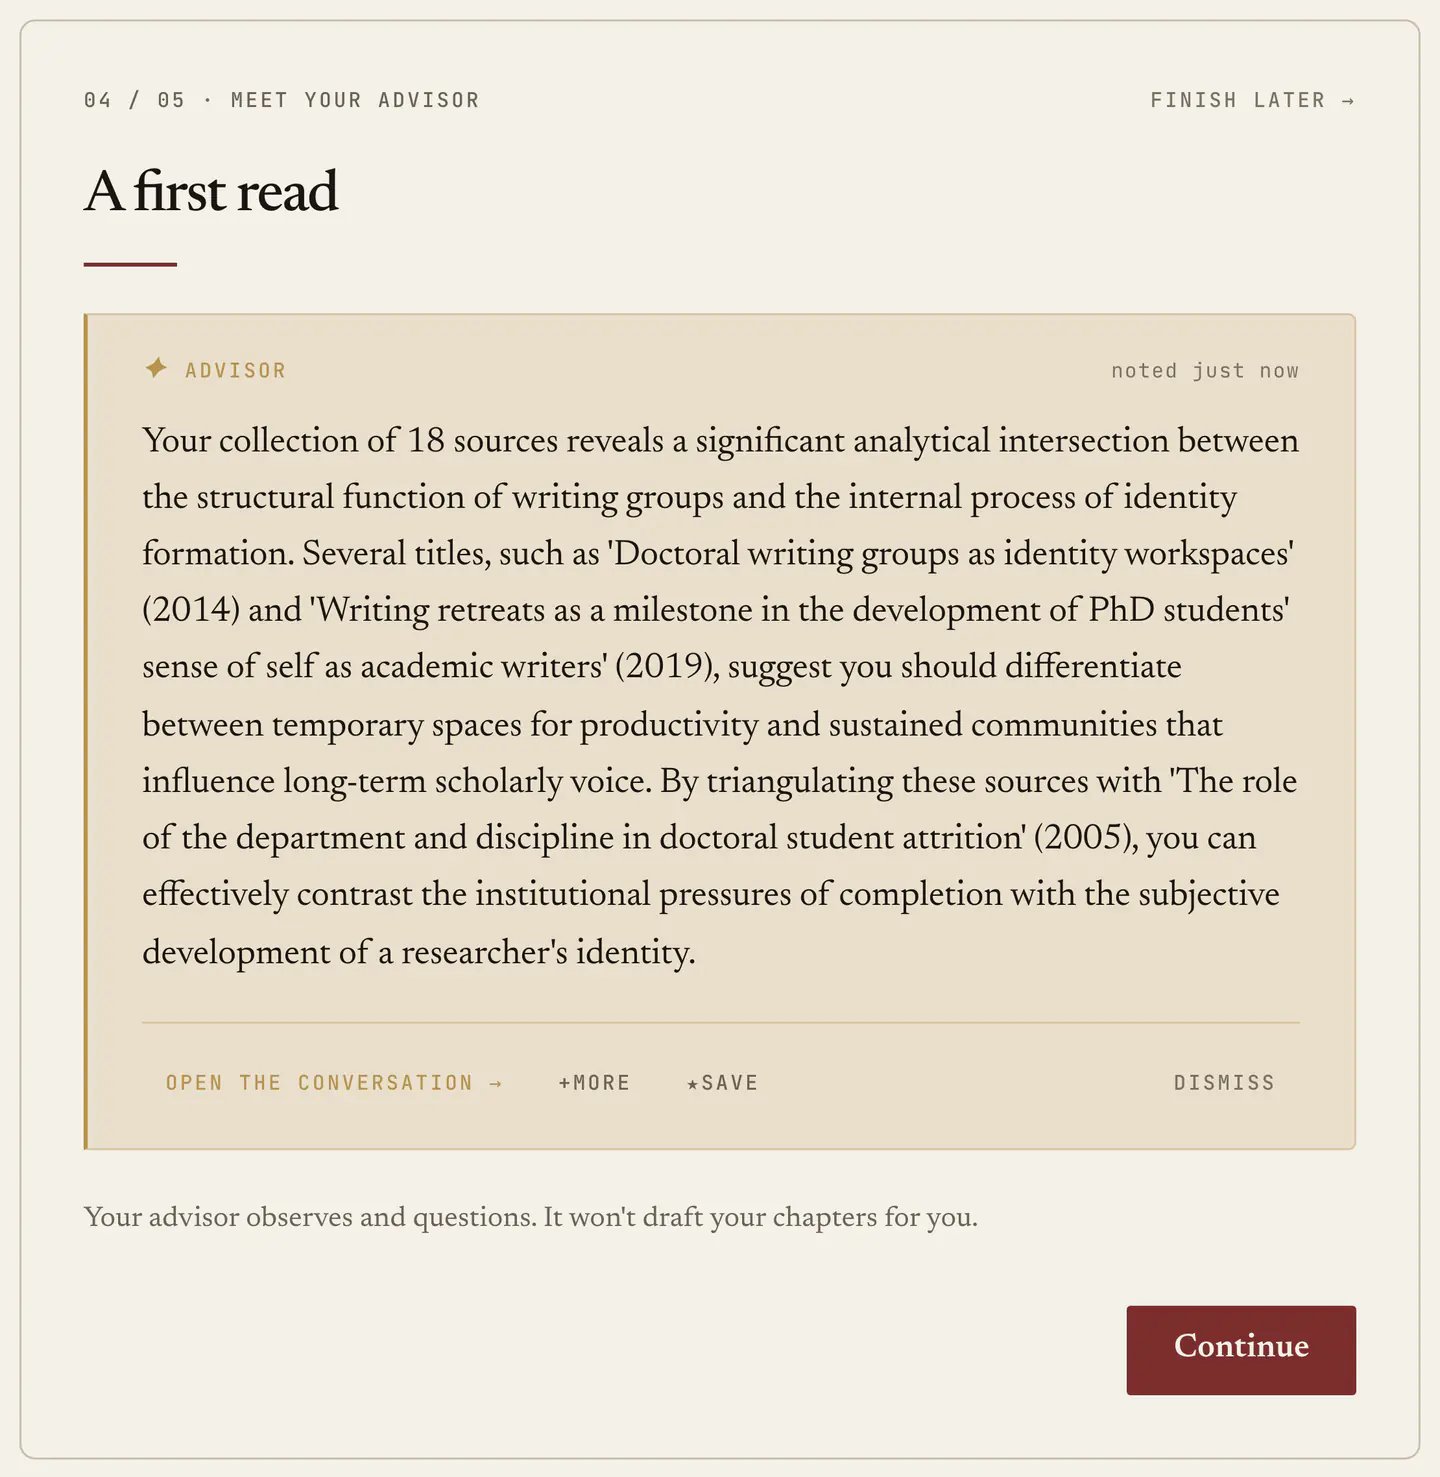 Under the observation you will see a line saying *"Your advisor observes and questions. It won't draft your chapters for you."*, which you should read as a description of the product rather than a caveat about it. [The Advisor](/manual/advisor) explains what that boundary means day to day.
## Step 5: Tune your advisor
Five sample observations, each written in a different register, and you mark the ones that sound like an advisor you would want to hear from while rejecting the ones that do not.
Showing it what good sounds like works faster than describing it, because most people can recognise the voice they want long before they can reason about settings in the abstract. The whole thing takes under a minute and you can skip it, since fuller tuning, including the behavioural levers and your own hard rules, lives in [Tuning the Advisor](/manual/advisor-preferences).
Then **Go to your project**.
## What you should have now
A named project placed somewhere in the doctoral arc, a library that is actually yours, questions in your own words, and one specific observation about how the two relate, which together make the minimum state in which the rest of Quester has something true to say.
Skip the sources or the questions and the app still works, though the Map will have little to read and the Advisor will mostly ask you for material, both of which a Zotero export fixes in about a minute.
Next: [Getting around](/manual/getting-around).
Under the observation you will see a line saying *"Your advisor observes and questions. It won't draft your chapters for you."*, which you should read as a description of the product rather than a caveat about it. [The Advisor](/manual/advisor) explains what that boundary means day to day.
## Step 5: Tune your advisor
Five sample observations, each written in a different register, and you mark the ones that sound like an advisor you would want to hear from while rejecting the ones that do not.
Showing it what good sounds like works faster than describing it, because most people can recognise the voice they want long before they can reason about settings in the abstract. The whole thing takes under a minute and you can skip it, since fuller tuning, including the behavioural levers and your own hard rules, lives in [Tuning the Advisor](/manual/advisor-preferences).
Then **Go to your project**.
## What you should have now
A named project placed somewhere in the doctoral arc, a library that is actually yours, questions in your own words, and one specific observation about how the two relate, which together make the minimum state in which the rest of Quester has something true to say.
Skip the sources or the questions and the app still works, though the Map will have little to read and the Advisor will mostly ask you for material, both of which a Zotero export fixes in about a minute.
Next: [Getting around](/manual/getting-around).